
 Register
 New Posts
 Distributor Directory
by ACE Services Mon Jun 10, 2019 12:25 pm
» So has this forum too, went the way of extinction too?
by Mo Wed May 01, 2019 9:13 pm
» Roll call....
by ACE Services Sat Apr 06, 2019 4:59 am
» New moves for business 2019
by ACpower1 Tue Feb 19, 2019 12:48 am
» Government shutdown
by ACE Services Tue Jan 22, 2019 5:35 am
» Stepped back in time
by Mo Mon Jan 21, 2019 11:47 am
» .....Christmas ever
by Mo Mon Jan 21, 2019 11:46 am
» have you ever use dyson for cleaning ?
by milspec6 Mon Dec 17, 2018 10:22 pm
» Water Heater
by Mo Mon Dec 17, 2018 8:31 pm
» anyone have an idea of why...?
by milspec6 Fri Dec 07, 2018 11:03 pm
» I don't know squat
by Matt; My carpet cleaner Wed Dec 05, 2018 11:14 pm
» what would you charge
by Mo Sun Dec 02, 2018 8:01 am
» Frozen cleaning for practice
by milspec6 Wed Nov 21, 2018 9:33 pm
» for the Holidays........
by Matt; My carpet cleaner Tue Nov 20, 2018 9:20 pm
» Pricing....ouch
by milspec6 Sat Nov 17, 2018 8:37 pm
Project Bud
Page 2 of 7 •  1, 2, 3, 4, 5, 6, 7
 ![]()
Re: Project Bud
![]() by milspec6 Fri Sep 26, 2014 6:57 pm
by milspec6 Fri Sep 26, 2014 6:57 pm
I actually purchased the factory manual on disc for a small fortune, but it was practically useless. It only gave generic descriptions, no real wiring schematics, and just all around disappointment.
I was trying to restore all the small things today (12v plug, power locks, dash lighting, etc.), but without any wiring diagrams, it just wasn't working well. I also needed to recharge the a/c, but my manual never stated how much refrigerant
Then I found a link off of a glass installer's site in the UK
http://www.weatherproof-windows.co.uk/nkr_repair_manual/PDF/LG4H-WE-9691.pdf
It's getting closer....now for the interior panels!

milspec6- Moderator

- Posts : 10088
Join date : 2013-09-21
Location : Nebraska -


Davey Cracker- Expert & Trusted Member

- Posts : 4796
Join date : 2013-09-20
Age : 57
Location : Long Beach CA
Re: Project Bud
![]() by milspec6 Mon Oct 06, 2014 7:16 pm
by milspec6 Mon Oct 06, 2014 7:16 pm
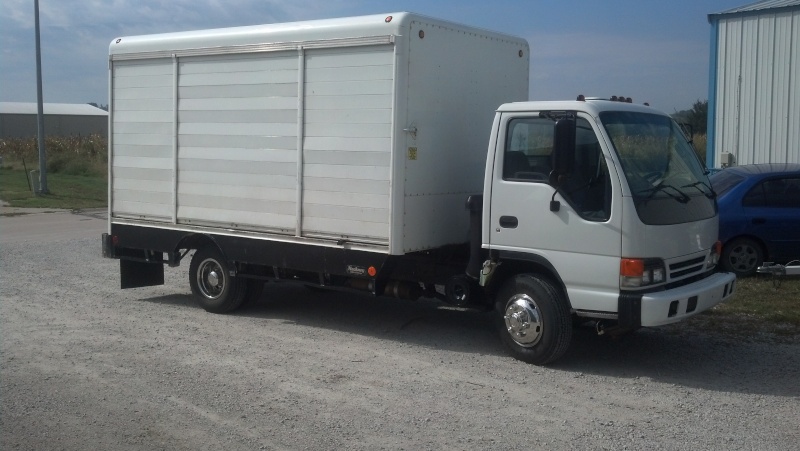
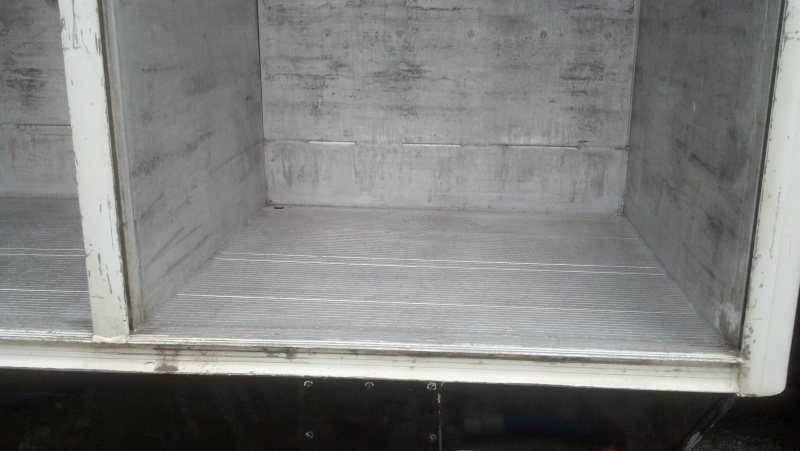
This truck was last used by a Tex-Mex restaraunt to deliver product between 3 restaraunts and they spilled a lot of grease! I mean it was up the sides of the walls and thick enough to scrape off with a putty knife in between the creases...then there was the spilled diesel oil and transmission fluid in one of the driver's side compartments.
I started with just the old degreasers like Simple Green...failed. Dishwashing soap...failed. Just wasn't getting anywhere, so I went to the heavy guns. The Easy-off HD oven cleaner, stiff brush, and a cobra tile tool....success!
The HD oven cleaner wiped out that grease and left the aluminum looking like it was brand new on the floor. As a side note, the "low vapor" version was useless, needed the HD version and LOTS of ventilation.
milspec6- Moderator
- Posts : 10088
Join date : 2013-09-21
Location : Nebraska -
Re: Project Bud
![]() by milspec6 Mon Oct 06, 2014 7:35 pm
by milspec6 Mon Oct 06, 2014 7:35 pm
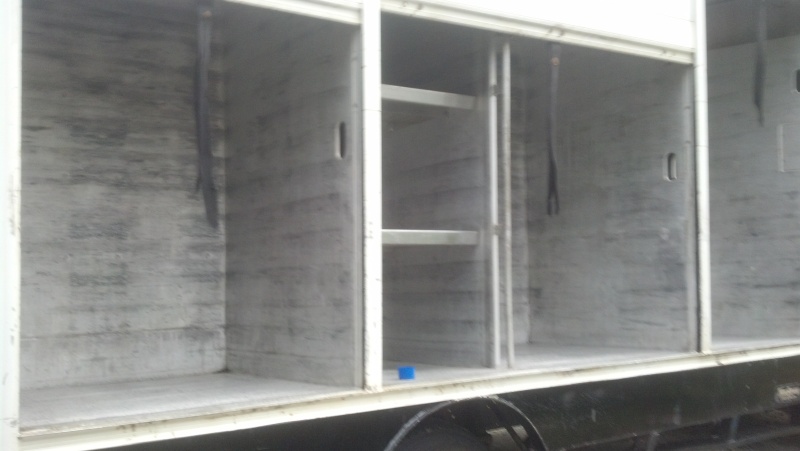
Compartment # 1 will have the TNT installed with the back wall removed.
Compartment # 2 is the problem area. I want to keep the shelves section in door number 2 and install pull-out slides. That would give me a 2x4 drawer to act as a work bench with vise and small tool box. I really like that idea, but it would mean that the LG heater would have to be installed on the other side of the truck since the hose reels will fill up compartment number 2 unless I was to remove the shelves section completely.
The third compartment will hold tools and drying equipment with the back wall removed to provide a full 4x8 space. That should hold about everything between the floor space and mounted quick fist clamps on the walls.
On the driver's side it would look like this. Behind the TNT will be a fair amount of space (3x4), but not sure what will be placed there just yet.
Behind the hose reels will be the LG heater, softener, and vertical water tank. The garden hose reel will mount from the ceiling live. This puts the heater on the same side as the fuel cell for the TNT which I am not real happy with, but it would put all the filling items (diesel, gas, propane) on the driver's side which would be convenient.
I guess I will not be certain on my plans until I get my hose reels. Then I can mock it up and adjust from there.
milspec6- Moderator
- Posts : 10088
Join date : 2013-09-21
Location : Nebraska -
Re: Project Bud
![]() by milspec6 Fri Oct 17, 2014 9:20 am
by milspec6 Fri Oct 17, 2014 9:20 am
My hopes are to have a working truck by the end of the week. It will still need a few things, but the basics should be in-place and operational.
The last item on my shopping list is the flooring. I was going to apply a coating like Durabak to the aluminum flooring, but then I figured that the aluminum really didn't need any protection, so why waste the money?
Well, my new plan is to install rubber flooring (gym flooring). Not really as protection, but for the following reasons:
1. Added insulation from the cold
2. Sound absorption
3. Vibration reduction
4. Easy on the knees when working on equipment
5. Preventing sun glare
6. Cleaner appearence
I have the choice of 1/4, 3/8, or 3/4 inch thick and various colors. I am leaning towards the 3/8 inch material, but not certain about how well they will handle caustic spills or heat exposure.
Just have to finalize that decision this weekend so that I can get them here by mid-week....decisions, decisions.
milspec6- Moderator
- Posts : 10088
Join date : 2013-09-21
Location : Nebraska -
Re: Project Bud
![]() by Davey Cracker Fri Oct 17, 2014 10:51 pm
by Davey Cracker Fri Oct 17, 2014 10:51 pm

Davey Cracker- Expert & Trusted Member
- Posts : 4796
Join date : 2013-09-20
Age : 57
Location : Long Beach CA
Re: Project Bud
![]() by milspec6 Sat Oct 18, 2014 5:30 am
by milspec6 Sat Oct 18, 2014 5:30 am
They also add some weight (almost 100 lbs. per mat), but that keeps them stationary without having to glue down as well. In the end, I think they will work out well.
Hopefully, I can get some pics up by Wed. in-between cleanings.
milspec6- Moderator
- Posts : 10088
Join date : 2013-09-21
Location : Nebraska -
Re: Project Bud
![]() by ACpower1 Sat Oct 18, 2014 7:01 am
by ACpower1 Sat Oct 18, 2014 7:01 am

ACpower1- Expert & Trusted Member
- Posts : 2495
Join date : 2013-11-01
Age : 40
Location : Seattle, WA -
Re: Project Bud
![]() by Mo Sun Oct 19, 2014 10:30 am
by Mo Sun Oct 19, 2014 10:30 am

Mo- Administrator
- Posts : 6664
Join date : 2013-09-19
Location : Arizona -
Re: Project Bud
![]() by milspec6 Mon Oct 20, 2014 2:40 pm
by milspec6 Mon Oct 20, 2014 2:40 pm
Keeping them clean is tricky since they are generally black and show everything, but the rolled versions come in other colors (beige, red, and blue that I've seen) so if that was a concern, I would look towards them in a 3/8 inch or thicker.
milspec6- Moderator
- Posts : 10088
Join date : 2013-09-21
Location : Nebraska -
Re: Project Bud
![]() by milspec6 Mon Oct 20, 2014 3:01 pm
by milspec6 Mon Oct 20, 2014 3:01 pm
I was about to start cutting out the back walls in the compartments 1 and 3 like planned, but I started to have second thoughts about my skill with a borrowed plasma cutter, so I took it to the best fabrication shop in my area.
It was a good sign that they already had 2 vending trucks in their shop being worked on (water bottle delivery) so I was confident that I found the right place.
The welder came out and asked me what I had in mind? I told him what I needed and he shook his head and asked me "You didn't already buy it did you?"
Apparently, these boxes are built like a jigsaw puzzle and the main support for everything are those back walls. The floor is not a solid panel, it is sectional and is welded to those center walls and the entire box spine runs through those same walls. "Remove them and the whole thing falls apart" was his description.
After studying it for about 15 minutes, he was able to offer a potential option...cutting a pass-through opening in the wall large enough to fit the TNT through while leaving some of the wall in place for support. It will require the floor to be braced up and it will leave a 2 inch wide by 40 inch opening in the floor of the box as well. He wasn't 100% certain that it would be a good idea, but said that he could cut a window in it first to verify the construction before going all the way.
That means that I can't open up the third compartment now which was going to be used for floor tools, chemical shelf, dehu, and air movers. It will still hold most of them (not the shelf), but they will be separated by a wall. The rubber floor will cover the flooring so the butchered floor will be hidden, but I really don't like the idea of having a bridge of material over the top of the TNT making maint. and engine removal difficult.
Worst part is that they can't get to it for at least another 1.5 weeks! I called other shops, but they all said about the same thing.
So, now I am a little deflated over this project. I'm already 20k into it and the TNT still sits in the garage and this truck is just blocking my shop....not making me a dime.
I could sell off the TNT and try to find a machine that will fit the compartment and focus towards setting up a dual machine truck instead. Or sell off the box to a vendor, shop for a traditional box and add roll-up doors.
The last option is to cut my losses and try to unload the whole thing and just run my current van until another option presents itself down the road.
I guess I have a week or two to decide......
milspec6- Moderator
- Posts : 10088
Join date : 2013-09-21
Location : Nebraska -
Re: Project Bud
![]() by milspec6 Mon Oct 20, 2014 4:56 pm
by milspec6 Mon Oct 20, 2014 4:56 pm
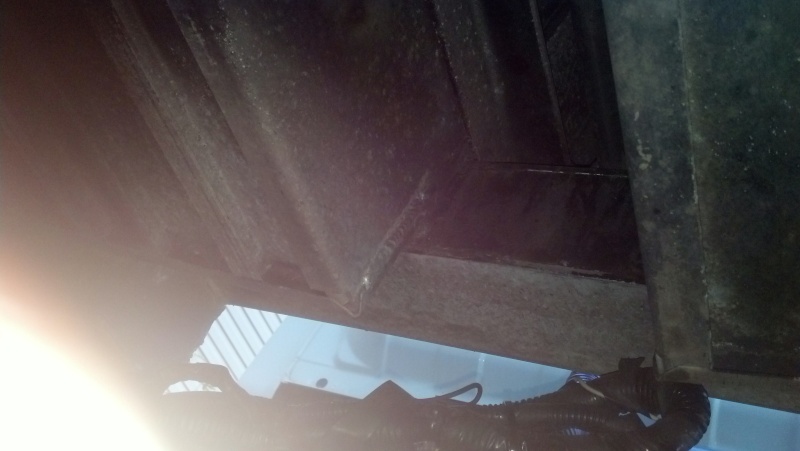
Each compartment floor is separate and they are actually "L" shaped with the floor and back wall being one-piece. The back wall of each section is then tack welded to a spine of metal supports that run the full length of the box at about every foot up. So, if you cut out the back wall, not only do you lost support for that section of floor, but you just severed the spine that was supporting the rest of the floor sections.
In addition to that, the gap between each floor section is not 2 inches, it is actually 6 inches (see photo from beneath the box) wrapped with a sheet of aluminum. So, even if we can cut a pass through without losing too much support, there will be a 6 inch wide gap running between the floors in the first compartment.
Now I am worried about this situation. There is almost a full 2 feet of back wall above the TNT height so there will be some support left and about 6 inches on either side of the TNT left of the back wall....although that means that there are also 4 spine supports being severed in the process.
Will the structure hold up to the lose of spine members and not sag / collapse over time? I really don't know at this point.
I'm just getting sick over the whole thing....I normally don't make mistakes like this one. I try to study a situation to death before pulling the trigger and yet I really blew it on this one.
milspec6- Moderator
- Posts : 10088
Join date : 2013-09-21
Location : Nebraska -
Re: Project Bud
![]() by milspec6 Mon Oct 20, 2014 5:00 pm
by milspec6 Mon Oct 20, 2014 5:00 pm
Sapphire 370
Boxxer 421
There may be others, but the vacuum doesn't impress me with the smaller machines. I am just lost right now.
milspec6- Moderator
- Posts : 10088
Join date : 2013-09-21
Location : Nebraska -
Re: Project Bud
![]() by Pro Touch Mon Oct 20, 2014 5:34 pm
by Pro Touch Mon Oct 20, 2014 5:34 pm
If you wanted to put a new sliding glass door in a wall of your house, you need to carry the load of the hole you are cutting out with increased posts and headers to carry the load.
The metal is no different and any good fabricator should be able to solve this problem and give you all the clearance you still need around the machine. Of course there will be some cost associated with it but it is solvable.

Pro Touch- Active Poster

- Posts : 493
Join date : 2013-09-20
Location : NC
Re: Project Bud
![]() by milspec6 Mon Oct 20, 2014 6:19 pm
by milspec6 Mon Oct 20, 2014 6:19 pm
Pro Touch wrote:It's just metal my friend and you just have to figure out how to redistribute the load.
If you wanted to put a new sliding glass door in a wall of your house, you need to carry the load of the hole you are cutting out with increased posts and headers to carry the load.
The metal is no different and any good fabricator should be able to solve this problem and give you all the clearance you still need around the machine. Of course there will be some cost associated with it but it is solvable.
Sure, there is always a way to make it work, but it isn't always worth the expense and trouble. Looking at this thing, to replace the structural support would take some sort of sub-frame beneath the box that would tie into the supports. Not out of the question, but at what cost?
One of the water trucks they were working on had to have the entire box framework redesigned after the box shifted to one side. They were 11 hours into it when I showed up and they said that it would take another 6 hours before it was done. I'm not certain I want to be in that situation when the bill comes down.
milspec6- Moderator
- Posts : 10088
Join date : 2013-09-21
Location : Nebraska -
Re: Project Bud
![]() by ACpower1 Mon Oct 20, 2014 10:29 pm
by ACpower1 Mon Oct 20, 2014 10:29 pm
But the good news is at most its about a 2800.00 dollar mistake, you can get a great condition box on that truck for that price. They are not hard to find.
even if you bought a machine that fit you would need to give it plenty of breathing room.
I would look into a nice grumman olsen box, or a morgan van body
ACpower1- Expert & Trusted Member
- Posts : 2495
Join date : 2013-11-01
Age : 40
Location : Seattle, WA -
Re: Project Bud
![]() by Davey Cracker Mon Oct 20, 2014 11:34 pm
by Davey Cracker Mon Oct 20, 2014 11:34 pm
I'm sure you can make it work!!.........without taking drastic measures.
Davey Cracker- Expert & Trusted Member
- Posts : 4796
Join date : 2013-09-20
Age : 57
Location : Long Beach CA
Re: Project Bud
![]() by milspec6 Tue Oct 21, 2014 1:53 am
by milspec6 Tue Oct 21, 2014 1:53 am
I was really hoping to get things loaded up by the end of the month, but these set-backs are discouraging. I wonder what else I may have missed in my research that might show up later.....
milspec6- Moderator
- Posts : 10088
Join date : 2013-09-21
Location : Nebraska -
Re: Project Bud
![]() by SCCC Tue Oct 21, 2014 8:42 am
by SCCC Tue Oct 21, 2014 8:42 am
I cant really see in the picture what you are saying but kinda understand.
I would place a piece of 2x2 angle iron welded to the seam then tacked to floor to support it and seal it from below.
After that is done you could lay a sheet of metal side to side and weld into place this would distribute the weight and also seal as well.
It not the best but you could also go with a waterproofed piece of high grade plywood, covered in a nice quality boat type carpet, or maybe a coat it with bed liner then your rubber mat.
Yes a bummer but it is fixable I would think and it would also open it up so you could have cross ventilation around you TM.

SCCC- Active Poster
- Posts : 370
Join date : 2014-01-13
Re: Project Bud
![]() by milspec6 Tue Oct 21, 2014 9:34 am
by milspec6 Tue Oct 21, 2014 9:34 am
I guess I will continue to load equipment into it as planned and see what happens when the shop can get to it.
milspec6- Moderator
- Posts : 10088
Join date : 2013-09-21
Location : Nebraska -
Re: Project Bud
![]() by milspec6 Wed Oct 22, 2014 5:17 pm
by milspec6 Wed Oct 22, 2014 5:17 pm
The best deal that I could find was at Tractor Supply Center in the next town over. Their mats were 4x6 panels 3/4 inch thick and a very nice color of black and grey specs. The best part was that they didn't have that diamond plate pattern or other crap that only traps dirt, it was a smooth side and a rough side....I chose to put the rough side down.
An added plus was that they didn't have the sulphur component in them, so they had no smell at all....not even a rubber smell.
Now if you haven't worked with these things before, let me tell you it is a work-out wrestling with them. Each panel weighs 100 lbs and they don't like to roll up, so you end up wrestling with a limp alligator moving them around....I had to fill 9 compartments, I'm beat.
Despite what you might find on the internet, I would never use a power tool on these things. It just takes a couple of steps to make them work real easily.
The key is to use a sharp blade on your carpet knife, lay the panel over a board to allow the cut to open up as you go, and wet the blade with WD-40. Just make several passes rather then trying to cut all the way through on a single pass....they have a lot of fiber content, so you will not be able to rip through it in a single pass unless you are a Gorilla.

The end result was pretty good. They should help dampen the noise, insulate the floor and as an added bonus, it helped seal the gap below the door slides. They sure make it more comfortable to kneel on without crushing from weight. I set 300 lbs on a mat in the garage and it didn't collapse, so it should be able to handle my equipment without losing support.

Next up will be the neoprene insulation panels in the TNT compartment and hose reel compartment to add some more sound deadening.
milspec6- Moderator
- Posts : 10088
Join date : 2013-09-21
Location : Nebraska -
Re: Project Bud
![]() by Davey Cracker Wed Oct 22, 2014 7:07 pm
by Davey Cracker Wed Oct 22, 2014 7:07 pm
Last edited by Davey Cracker on Wed Oct 22, 2014 7:48 pm; edited 1 time in total
Davey Cracker- Expert & Trusted Member
- Posts : 4796
Join date : 2013-09-20
Age : 57
Location : Long Beach CA
Re: Project Bud
![]() by milspec6 Wed Oct 22, 2014 7:36 pm
by milspec6 Wed Oct 22, 2014 7:36 pm
I sure wouldn't go that thick in a van...just too heavy, but figured I was okay in the box truck. They are designed to hold a 1,000 lb horse without crushing so my little old carpet equipment shouldn't phase it any.
milspec6- Moderator
- Posts : 10088
Join date : 2013-09-21
Location : Nebraska -
Re: Project Bud
![]() by milspec6 Tue Dec 16, 2014 5:07 pm
by milspec6 Tue Dec 16, 2014 5:07 pm
I found a shop in the neighboring town which was a very high-end fabricator. He mostly builds armored vehicles and monster trucks, but I thought he might be the right guy for this project.
He looked it over for about 10 minutes and concluded that it looked like an "easy modification". He went on to illustrate what he would do to allow access while maintaining support to prevent the doors from binding.
Basically, it consisted of a V-shaped brace below the box tied to the vehicle frame. Then cutting out the back wall access, welding a plate over the floor opening, and adding a second brace above the walls to tie it into the front of the box to keep things from sagging over time.
He even drew it up on paper and kept saying that it shouldn't be a problem....then he told me that he doesn't weld aluminum and that I needed to find a good TIG welder with aluminum experience.
I asked if he could suggest a place and he told me that the best guy for aluminum welding is the same guy that I have been waiting for in the first place.
So, I am back to square one, but at least it sounds like this project is fixable for my needs....just a matter of time. I will try again on Friday and hope that he has some Christmas gifts to buy and could use some cash.
milspec6- Moderator
- Posts : 10088
Join date : 2013-09-21
Location : Nebraska -
Re: Project Bud
![]() by Mo Tue Dec 16, 2014 10:11 pm
by Mo Tue Dec 16, 2014 10:11 pm
Mo- Administrator
- Posts : 6664
Join date : 2013-09-19
Location : Arizona -
Page 2 of 7 • 1, 2, 3, 4, 5, 6, 7 ![]()
» Any car nuts want a project?
» My other Truckmount project
» Subaru project car detail
» Home build project
|
|
|