
 Register
 New Posts
 Distributor Directory
by ACE Services Mon Jun 10, 2019 12:25 pm
» So has this forum too, went the way of extinction too?
by Mo Wed May 01, 2019 9:13 pm
» Roll call....
by ACE Services Sat Apr 06, 2019 4:59 am
» New moves for business 2019
by ACpower1 Tue Feb 19, 2019 12:48 am
» Government shutdown
by ACE Services Tue Jan 22, 2019 5:35 am
» Stepped back in time
by Mo Mon Jan 21, 2019 11:47 am
» .....Christmas ever
by Mo Mon Jan 21, 2019 11:46 am
» have you ever use dyson for cleaning ?
by milspec6 Mon Dec 17, 2018 10:22 pm
» Water Heater
by Mo Mon Dec 17, 2018 8:31 pm
» anyone have an idea of why...?
by milspec6 Fri Dec 07, 2018 11:03 pm
» I don't know squat
by Matt; My carpet cleaner Wed Dec 05, 2018 11:14 pm
» what would you charge
by Mo Sun Dec 02, 2018 8:01 am
» Frozen cleaning for practice
by milspec6 Wed Nov 21, 2018 9:33 pm
» for the Holidays........
by Matt; My carpet cleaner Tue Nov 20, 2018 9:20 pm
» Pricing....ouch
by milspec6 Sat Nov 17, 2018 8:37 pm
TM Upgrade/Rebuild
:: Forums :: Ask The TM Mechanic
Page 4 of 11 •  1, 2, 3, 4, 5 ... 9, 10, 11
 ![]()
Re: TM Upgrade/Rebuild
![]() by milspec6 Mon Mar 17, 2014 9:46 pm
by milspec6 Mon Mar 17, 2014 9:46 pm
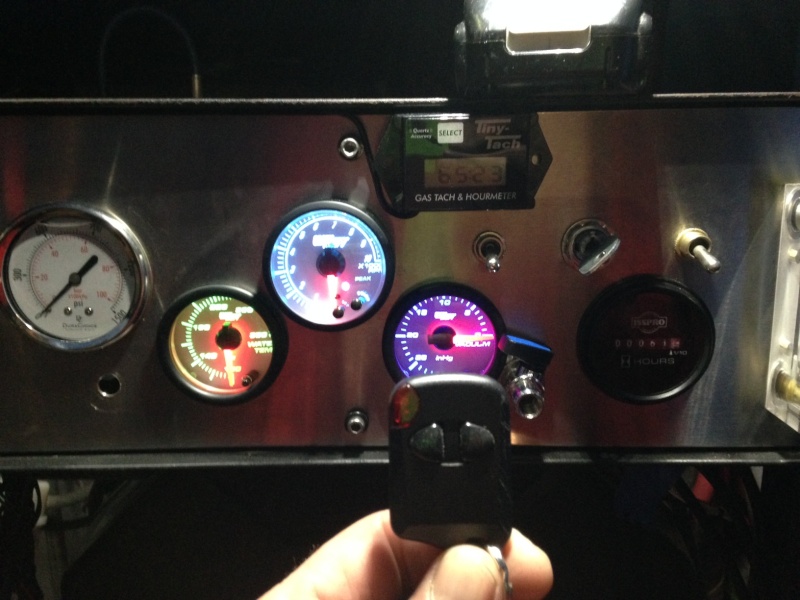
Cool look and makes me want to change my gauges now....dang you and your toys.

milspec6- Moderator

- Posts : 10088
Join date : 2013-09-21
Location : Nebraska -

Re: TM Upgrade/Rebuild
![]() by Davey Cracker Mon Mar 17, 2014 10:25 pm
by Davey Cracker Mon Mar 17, 2014 10:25 pm
This is much simpler than what I came up with the first time, which was just made from off the self stuff from the local industrial supply warehouse. But there was a couple probs with that setup, complicated with an upper and lower flange, that required perfect alignment of small section of pipe between, which never happened. LOL And the heat transfer to the van floor was honorable with it! I also thought I could temporarily get away with bolting it down on top of the plywood now covering the van floor, until I pulled out the TM frame for painting, and then figured I'd remove the plywood being much easier to access. But the plywood did start to disintegrate with the heat, no, it didn't catch fire, but just scorched away until I end up with an exhaust leak there.

Moral of the story, the EZ way isn't always the best way. LOL
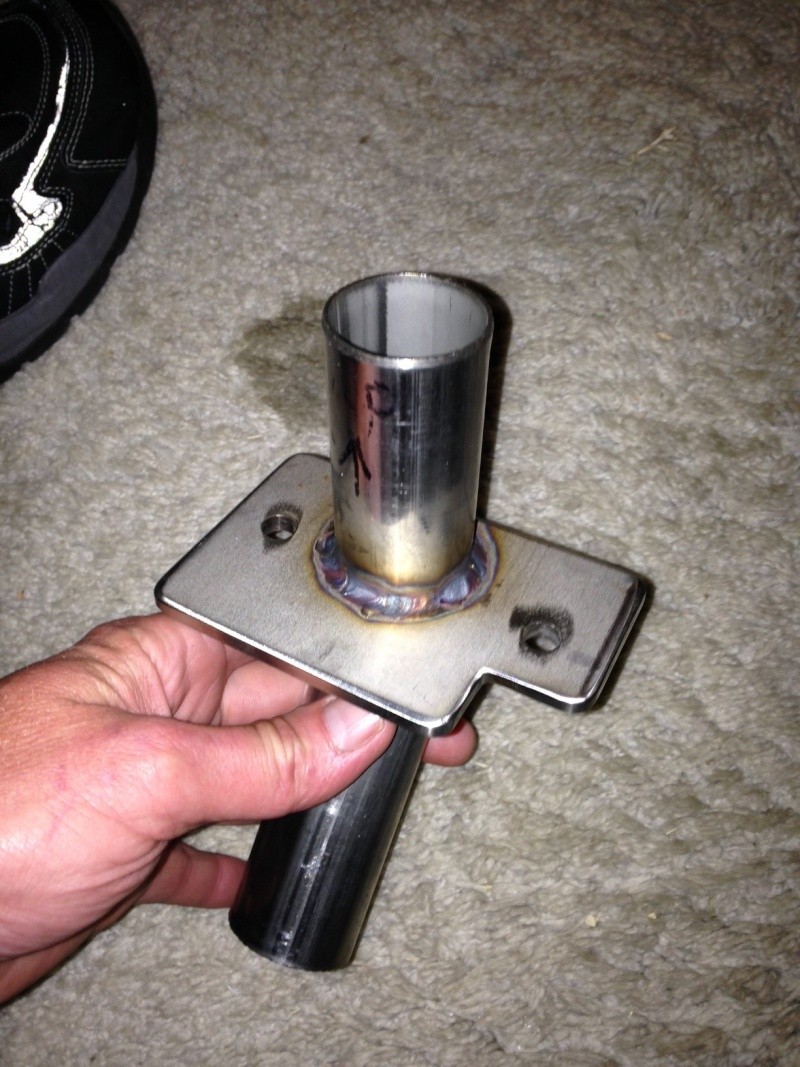
So, I've now removed the plywood in the area, and what I have now is one piece tube going from inside to outside van, with a single flange welded to it that will bolt down from inside the van. I will use some think high-temp material between flange and van floor that should keep heat transfer to a min now.
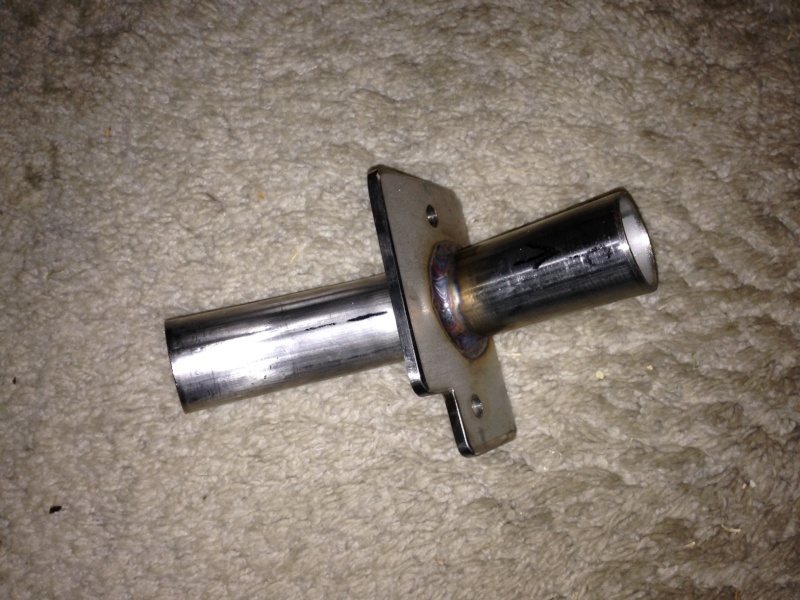
How it will sit, made to fit between the high areas of corrugated van floor, so it sits flush.


Davey Cracker- Expert & Trusted Member

- Posts : 4796
Join date : 2013-09-20
Age : 57
Location : Long Beach CA
Re: TM Upgrade/Rebuild
![]() by Mo Mon Mar 17, 2014 10:28 pm
by Mo Mon Mar 17, 2014 10:28 pm

Mo- Administrator
- Posts : 6664
Join date : 2013-09-19
Location : Arizona -
Re: TM Upgrade/Rebuild
![]() by Davey Cracker Mon Mar 17, 2014 10:30 pm
by Davey Cracker Mon Mar 17, 2014 10:30 pm
 ......
Davey Cracker- Expert & Trusted Member
- Posts : 4796
Join date : 2013-09-20
Age : 57
Location : Long Beach CA
Re: TM Upgrade/Rebuild
![]() by ACE Services Tue Mar 18, 2014 5:44 am
by ACE Services Tue Mar 18, 2014 5:44 am

ACE Services- Truckmount Mechanic
- Posts : 813
Join date : 2013-09-23
Age : 61
Location : Cameron NC
Re: TM Upgrade/Rebuild
![]() by Davey Cracker Thu Mar 20, 2014 8:23 pm
by Davey Cracker Thu Mar 20, 2014 8:23 pm
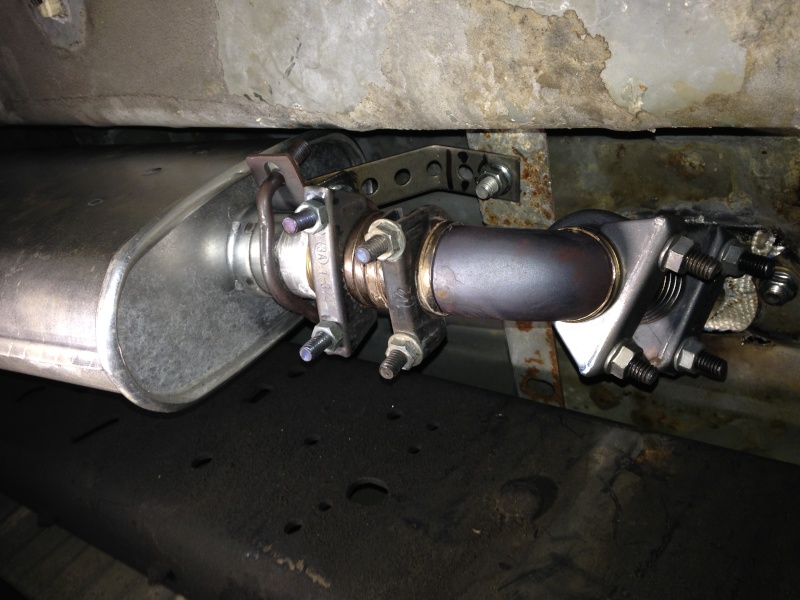
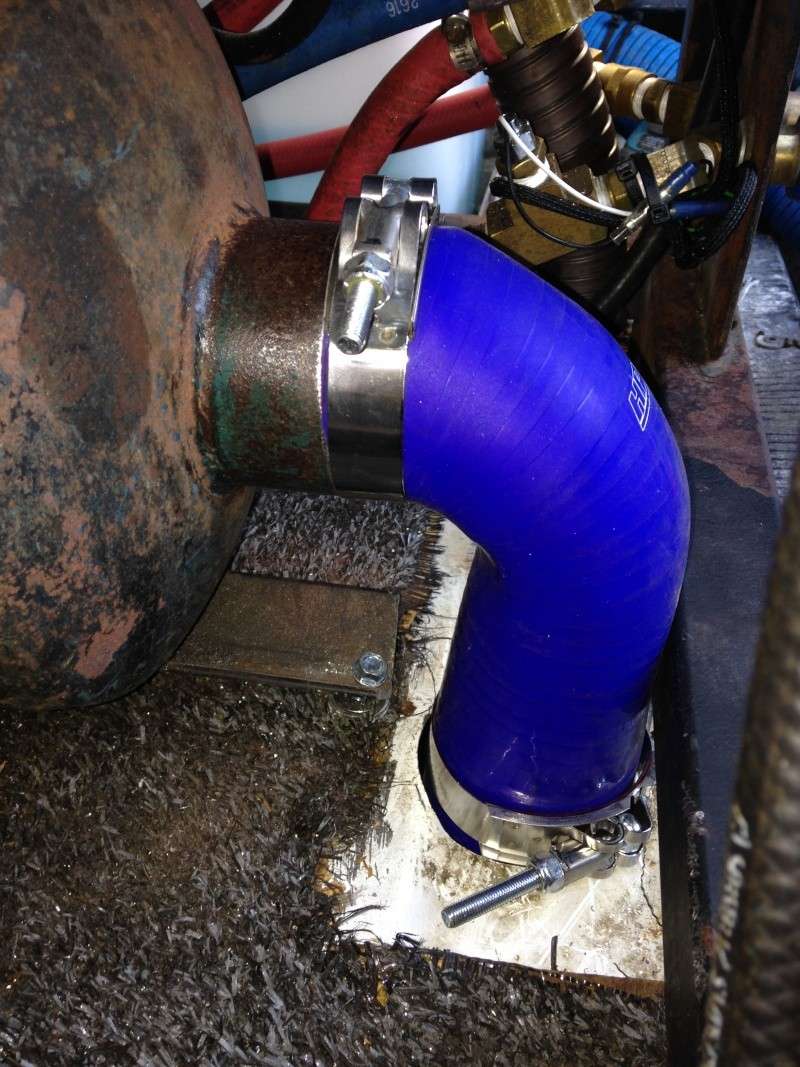
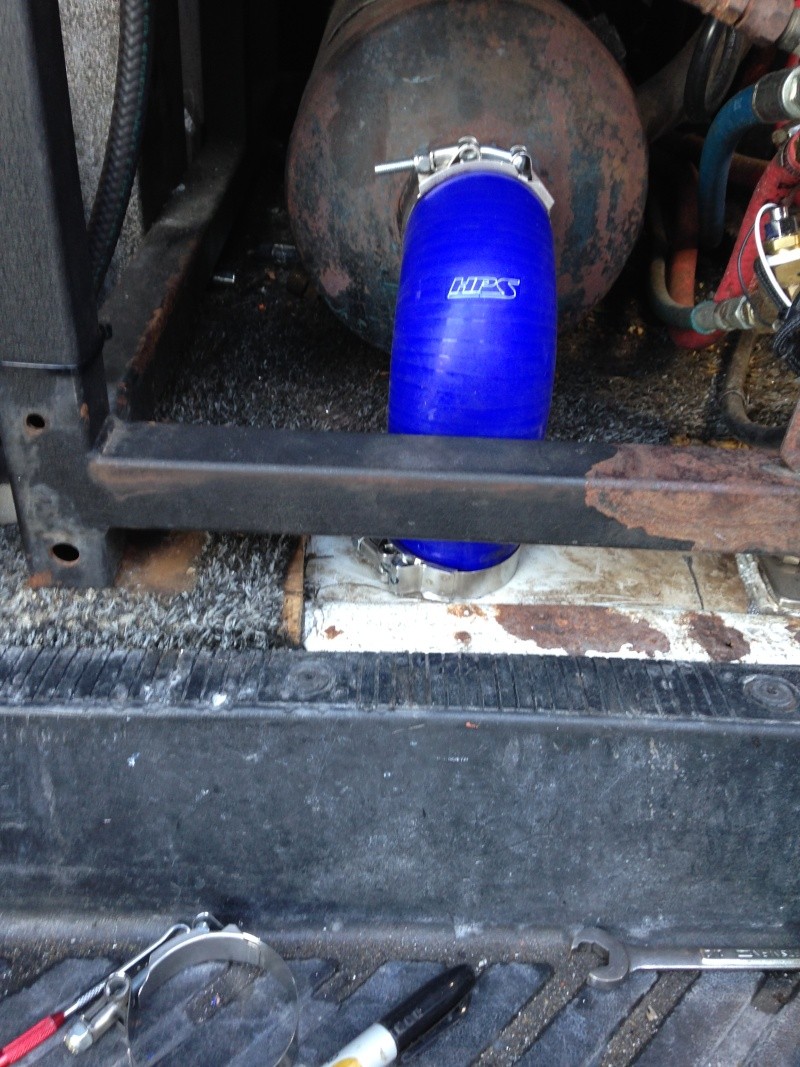
It's 1.5" from the 2into1 header, all the way threw to the directional tail pipe..........I made the tail pipe directional, so I can point it anyway needed, usually away from the house/job.
I've used this new flange setup two days now and it's working great!.......So I AM Happy!

The van floor still gets a bit warm right around the flange, but not enough that's it's a problem at all.
This time I used several layers of "Pipe Wrap" between the Stainless flange and van floor.......I figured I'd use the wrap until I found a better insulating material to minimize heat transfer, but the pipe wrap seems to be working great, so it's looking like I don't need anything else.
Check it out.................


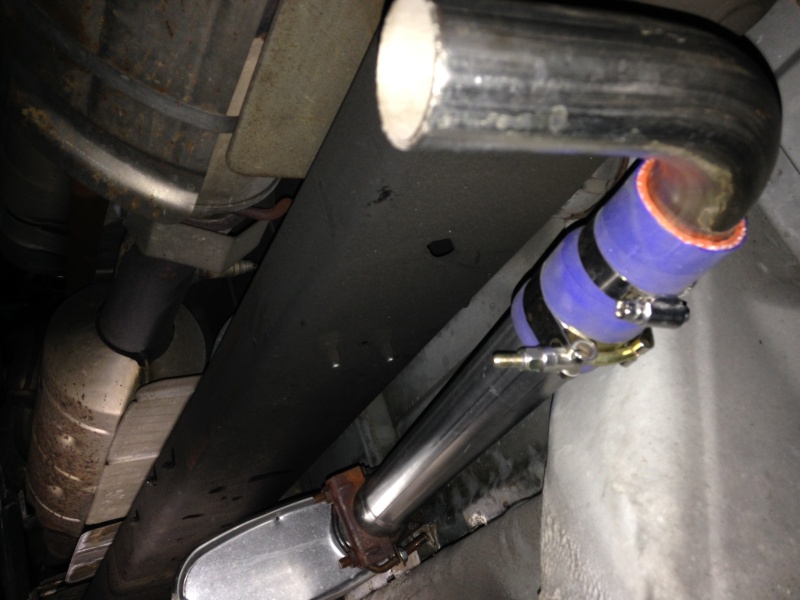
I just snugged down hose clamp around the blue silicone hose so the 90 deg tail pipe won't fall out, but it's just loose enuf to easily rotate by hand so I can point it away from the job.
Davey Cracker- Expert & Trusted Member
- Posts : 4796
Join date : 2013-09-20
Age : 57
Location : Long Beach CA
Re: TM Upgrade/Rebuild
![]() by Mo Thu Mar 20, 2014 8:47 pm
by Mo Thu Mar 20, 2014 8:47 pm
Mo- Administrator
- Posts : 6664
Join date : 2013-09-19
Location : Arizona -
Re: TM Upgrade/Rebuild
![]() by Davey Cracker Thu Mar 20, 2014 8:56 pm
by Davey Cracker Thu Mar 20, 2014 8:56 pm
Mo wrote:Looks heavy duty enough to withstand the ride. The muffler looks like the one on the TNT. Did you insulate the panel?
The muffler is a Walker OEM replacement for a '95 Honda Civic!
I haven't yet put the DynaMat on the inside of the front panel, cause I've been busy redoing lol the exhaust, and also hooking up the remote system for the pump clutch....which I used for the first time today, and it works excellent............I was able to turn on/off from almost 300" away inside of a condo on the 5th floor!!
I'll post more info and pics on that later tonight.
.........
Davey Cracker- Expert & Trusted Member
- Posts : 4796
Join date : 2013-09-20
Age : 57
Location : Long Beach CA
Re: TM Upgrade/Rebuild
![]() by Davey Cracker Fri Mar 21, 2014 12:47 am
by Davey Cracker Fri Mar 21, 2014 12:47 am
The setup I bought is RF rather than IR, so you don't need to be in the "line of sight" for it to work. And I wired in a magnetic stick-on cell type antenna to the antenna wire to increase signal strength and range.
Also, I wanted to be able to use the remote and still turn on/off the clutch from the panel on the TM, so I added a toggle switch so when it's flipped up it gives the control to the remote, which is the same small type used for car alarms, when I flip the switch down it gives control to the existing switch to turn on/off pump clutch..............so I can still manually control it standing at the machine, or flip switch and remotely control it.
The switch to the right of key switch is the original clutch on/off switch, and then the one to the left of key switch is then new added one to give control to either the remote or panel switch..............
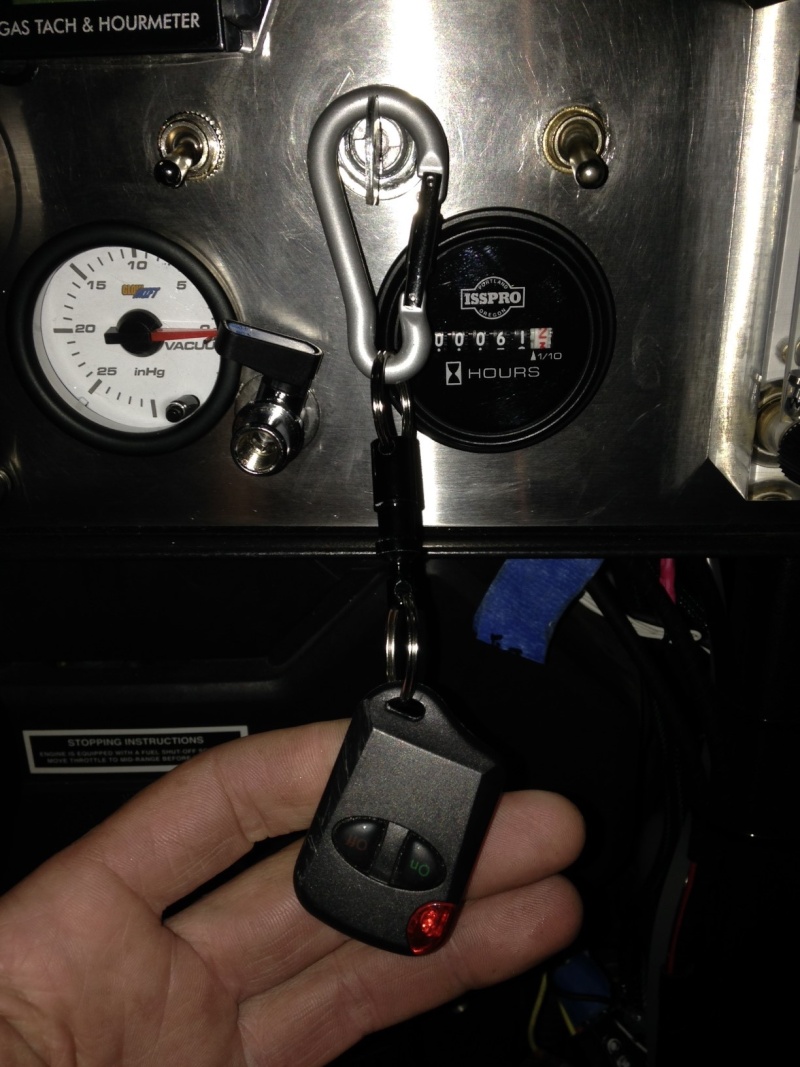
Upper Left of Pic, you can see the mag. stick-on antenna stuck to top of van to increase range.

Davey Cracker- Expert & Trusted Member
- Posts : 4796
Join date : 2013-09-20
Age : 57
Location : Long Beach CA
Re: TM Upgrade/Rebuild
![]() by gtech12v Fri Mar 21, 2014 10:34 am
by gtech12v Fri Mar 21, 2014 10:34 am
nice good job ....
gtech12v- Active Poster

- Posts : 195
Join date : 2013-12-09
Re: TM Upgrade/Rebuild
![]() by Davey Cracker Sat Mar 22, 2014 9:59 pm
by Davey Cracker Sat Mar 22, 2014 9:59 pm
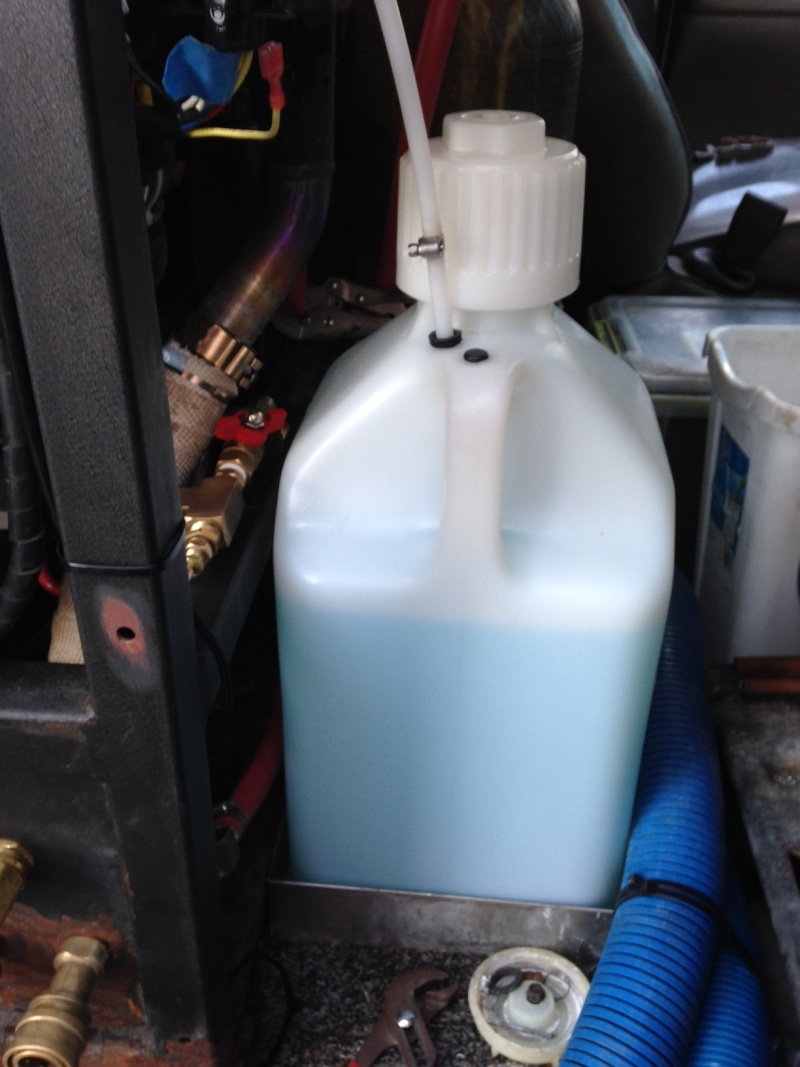
And the other nice thing, I tapped the pickup into the top of jug rather than the cap so when refilling it's easier.
Davey Cracker- Expert & Trusted Member
- Posts : 4796
Join date : 2013-09-20
Age : 57
Location : Long Beach CA
Re: TM Upgrade/Rebuild
![]() by ACpower1 Sat Mar 22, 2014 10:30 pm
by ACpower1 Sat Mar 22, 2014 10:30 pm
maybe with the right guides and corner guards you could do it while you clean? might be too risky

ACpower1- Expert & Trusted Member
- Posts : 2495
Join date : 2013-11-01
Age : 40
Location : Seattle, WA -
Re: TM Upgrade/Rebuild
![]() by Davey Cracker Sat Mar 22, 2014 11:37 pm
by Davey Cracker Sat Mar 22, 2014 11:37 pm
ACpower1 wrote:nice! would be cool to have a remote on an electric hose reel. so when your getting close to the front door and you move a lot of hose outside you can hit it and have it pull it all in to keep walkway clear.
maybe with the right guides and corner guards you could do it while you clean? might be too risky
The remote system I got will work on anything that's 12v dc, but I can't help on what you're talking about...........nor I'm I responsible.
Davey Cracker- Expert & Trusted Member
- Posts : 4796
Join date : 2013-09-20
Age : 57
Location : Long Beach CA
Re: TM Upgrade/Rebuild
![]() by Davey Cracker Sun Apr 06, 2014 1:39 am
by Davey Cracker Sun Apr 06, 2014 1:39 am
Here's a couple things I've done lately, and I think I'm about ready to finally pull it out of the van and have the frame LineX'ed.....as soon as I feel like I'll have a break from jobs, to be down for a couple days to do it.
Blower exhaust run threw the floor of van, so its no longer exiting front of TM......helps make it quieter.
Installed Dynomat (or in my case FatMax) installed inside of front panel to help with noise also.

\
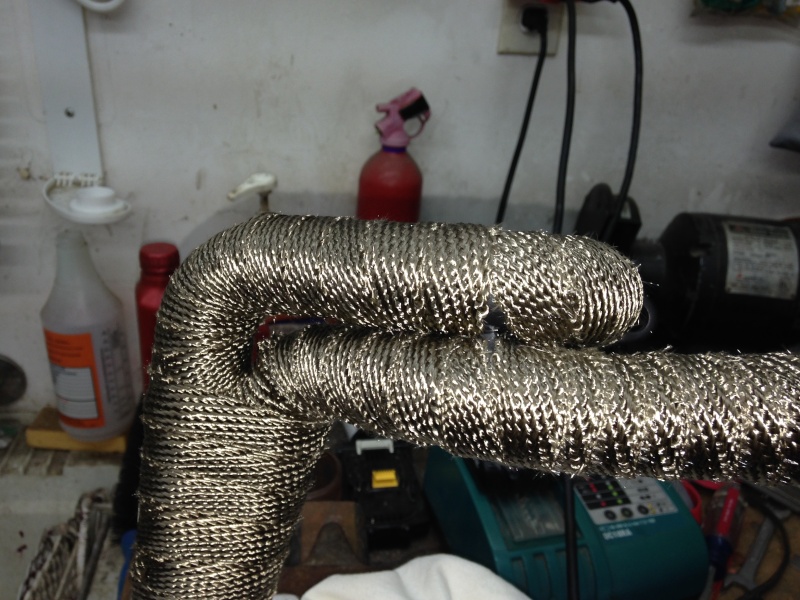
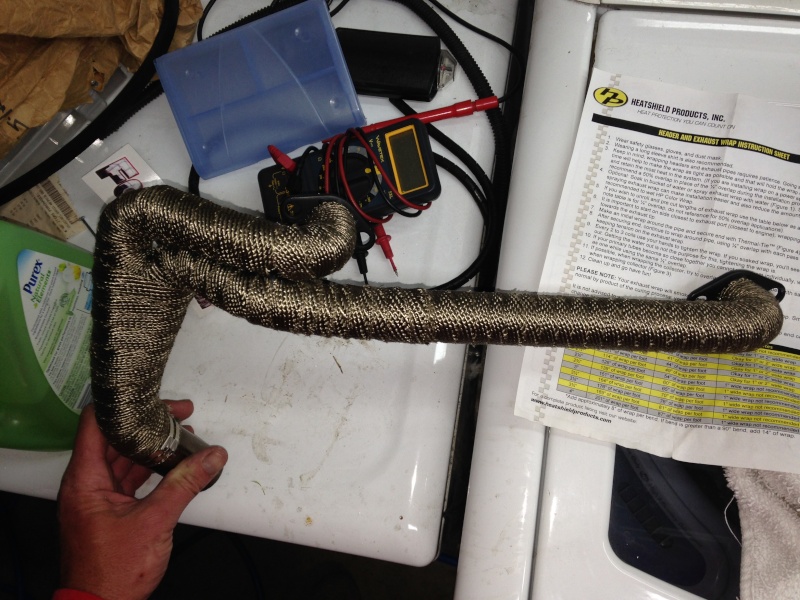
And tonight I got the Kohler header painted to protest from rust, and heat wrapped.
Davey Cracker- Expert & Trusted Member
- Posts : 4796
Join date : 2013-09-20
Age : 57
Location : Long Beach CA
Re: TM Upgrade/Rebuild
![]() by milspec6 Sun Apr 06, 2014 5:40 am
by milspec6 Sun Apr 06, 2014 5:40 am
I really like this group, must have learned at least one new thing per day since joining!!
http://www.jegs.com/p/Pit-Pal/Pit-Pal-5-Gallon-Fuel-Jug/1995279/10002/-1
milspec6- Moderator
- Posts : 10088
Join date : 2013-09-21
Location : Nebraska -
Re: TM Upgrade/Rebuild
![]() by gtech12v Mon Apr 07, 2014 3:13 pm
by gtech12v Mon Apr 07, 2014 3:13 pm
gtech12v- Active Poster
- Posts : 195
Join date : 2013-12-09
Re: TM Upgrade/Rebuild
![]() by Mo Mon Apr 07, 2014 3:20 pm
by Mo Mon Apr 07, 2014 3:20 pm
Mo- Administrator
- Posts : 6664
Join date : 2013-09-19
Location : Arizona -
Re: TM Upgrade/Rebuild
![]() by Davey Cracker Mon Apr 07, 2014 3:38 pm
by Davey Cracker Mon Apr 07, 2014 3:38 pm
gtech12v wrote:Is the header stainless steel someone mentioned that if is not, wrapping isn't recommended because it will rust and break quick
If it happens oh well, I have to make some new ones.....I'm just tired of being burned by hot pipes, so I'll take that chance! You know, there's some serious varying opinions on pipe wrapping, so without my own experience I really don't know what's fact or not. ....Also, I have a couple very good coats of very high temp baked on paint under the wrap, so that should help to prevent rusting.
But yes and no being SS lol.............the original Kohler header pipes are mild steel, but from where I added the 2into1 and all the way out from there IS SS.
Davey Cracker- Expert & Trusted Member
- Posts : 4796
Join date : 2013-09-20
Age : 57
Location : Long Beach CA
Re: TM Upgrade/Rebuild
![]() by Jan Sullins Mon Sep 22, 2014 6:41 pm
by Jan Sullins Mon Sep 22, 2014 6:41 pm
that Onan 20HP engine. Back when they were building those they must have done it
right. My new EZ TM has a Kohler Command 20HP with a 3L / 36 vac blower. A 25 HP
Kohler will hardly be working with your truckmount. Really like your gauges and just
a great job on refurbishing your TM. Also running your exhaust underneath truck into
a big muffler is cool !
Jan Sullins- Member

- Posts : 40
Join date : 2014-04-15
Age : 72
Location : Oklahoma City
Re: TM Upgrade/Rebuild
![]() by Davey Cracker Mon Sep 22, 2014 7:18 pm
by Davey Cracker Mon Sep 22, 2014 7:18 pm
Everything has been working great, I'm now approaching almost 300 hrs on Kohler eng and mods I did.
I still haven't got it really finished tho. I had planned to remove the TM from my van to have the frame sand blasted and Line-X coated, but have just been too busy running it this summer.
Davey Cracker- Expert & Trusted Member
- Posts : 4796
Join date : 2013-09-20
Age : 57
Location : Long Beach CA
Re: TM Upgrade/Rebuild
![]() by Davey Cracker Tue Dec 23, 2014 5:56 pm
by Davey Cracker Tue Dec 23, 2014 5:56 pm
Mo wrote:Looking good. Can't wait to see it when its completely done.
It may actually happen soon! At least that's my plan, now that things are slowing down. I'm hopping to be able to do it all in a weeks time in mid-late January. I'm in serious planning mode now, so I can be well prepared, I hope.
It's a lot of work to do in a week, but I can't afford more down time without a running back up at this point.
The list is long, so wish me luck.
Here's my list of things I've thought of in the last two days, and I'm sure there will be more added as I think of them.
Fabrication....
Move pump forward, weld pump brackets
Move Eng back so coupler to go on further
(Slot holes in frame)
Remove rusted and Fab/Weld new frame legs
Fix rusted van floor
Replace blower front seals
Cut out plywood under machine
Install rubber flooring
Clean up/replace wiring
Bolt down TM closer to step
Sand blast and Powder Coat or Line-X.....
TM Frame
Water box
Front panel
Hose reel
Chem shelf
Davey Cracker- Expert & Trusted Member
- Posts : 4796
Join date : 2013-09-20
Age : 57
Location : Long Beach CA
Re: TM Upgrade/Rebuild
![]() by Larry Henson Thu Dec 25, 2014 3:29 pm
by Larry Henson Thu Dec 25, 2014 3:29 pm
gtech12v wrote:Is the header stainless steel someone mentioned that if is not, wrapping isn't recommended because it will rust and break quick
I wrapped my stainless steel header from John's and it still broke. I think the wrap holds in moisture and causes this but also keeps the water hotter. Name your poison.

Larry Henson- Active Poster
- Posts : 409
Join date : 2013-09-20
Age : 57
Location : Daphne, Alabama -
Re: TM Upgrade/Rebuild
![]() by Davey Cracker Thu Dec 25, 2014 3:37 pm
by Davey Cracker Thu Dec 25, 2014 3:37 pm
Last edited by Davey Cracker on Thu Dec 25, 2014 10:07 pm; edited 1 time in total
Davey Cracker- Expert & Trusted Member
- Posts : 4796
Join date : 2013-09-20
Age : 57
Location : Long Beach CA
Re: TM Upgrade/Rebuild
![]() by SCCC Thu Dec 25, 2014 9:53 pm
by SCCC Thu Dec 25, 2014 9:53 pm
Our TM's not so much, yes it provides better heat but we are not taking our tm's out after every day of use, or replacing parts like race teams.
There is a lot of talk about this but a lot of people think it rust but it is also heat causing metal to break down faster.

SCCC- Active Poster
- Posts : 370
Join date : 2014-01-13
Re: TM Upgrade/Rebuild
![]() by Mo Fri Dec 26, 2014 12:59 am
by Mo Fri Dec 26, 2014 12:59 am
Mo- Administrator
- Posts : 6664
Join date : 2013-09-19
Location : Arizona -
Page 4 of 11 • 1, 2, 3, 4, 5 ... 9, 10, 11 ![]()
» is this a decent TM to rebuild?
» Workmaster Electric Truckmount Rebuild
» Soft touch valve rebuild
» Vacuum port upgrade
:: Forums :: Ask The TM Mechanic
|
|
|